
Make a Tattoo Stencil from Your Artwork at Home
Turn a drawing into a clean, print-ready tattoo stencil at home: line clarity, background removal, true-size printing, and skin-safety rules.
Last month I finally sketched the custom piece I want on my forearm — a moth with open wings, fine linework, a few stippled shadows. I was proud of the drawing. Then I booked the consult and the artist asked the one question I had not planned for: “Can you bring a stencil, or do you want me to trace it freehand?” Freehand from a photo is slow and loses detail. A stencil is the bridge between the drawing in your head and the lines that actually land on skin.
This guide walks through how to make a tattoo stencil from your own artwork at home: the traditional hand-tracing method, where an AI stencil generator saves you time, and the print-sizing and safety details that decide whether the stencil reads cleanly once it is on skin. The difference between a rough sketch and a transfer-ready contour is the whole game, and it is smaller than most people expect.
What a tattoo stencil actually is
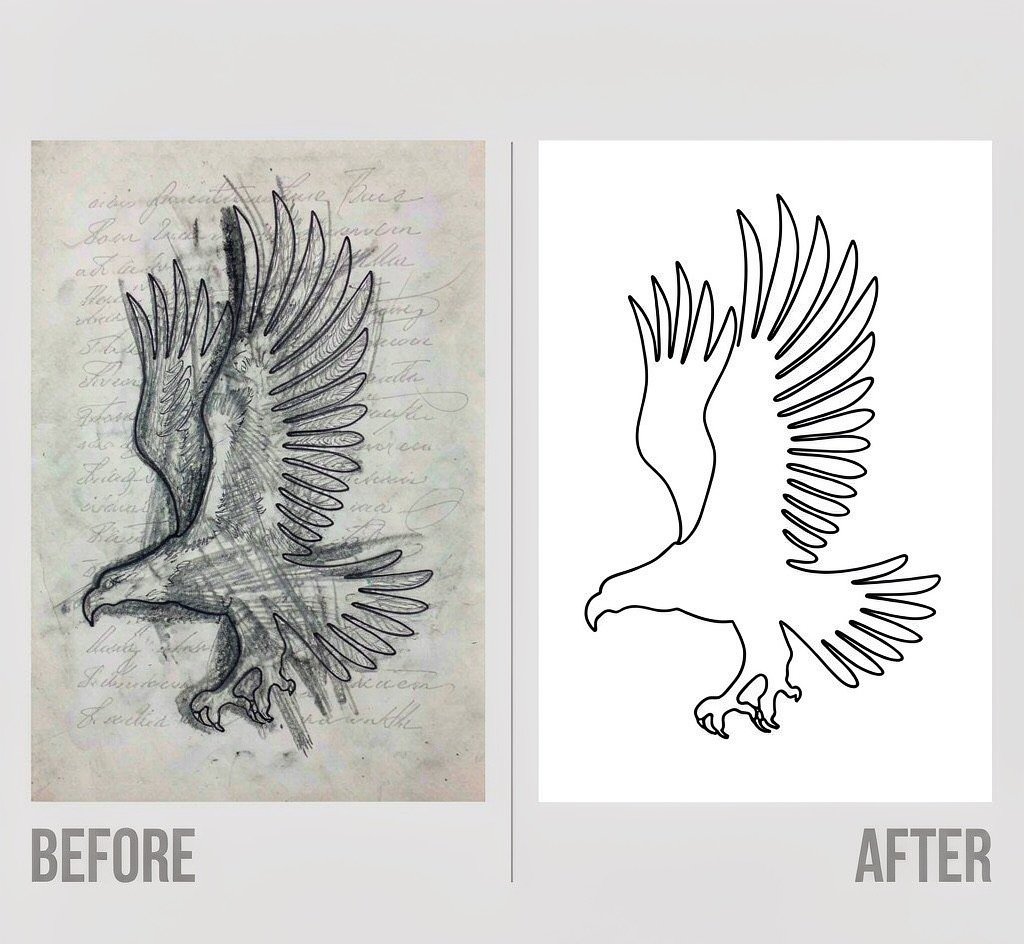
A tattoo stencil is a contour template of the design — flat black lines on white, no color, no photographic tone. It is transferred onto the skin with transfer gel so the artist has a precise guide to follow before any needle goes in. As one stencil tool puts it, “a stencil is a photograph with everything removed except what a needle can follow” (Kavel).
It is not the final tattoo. It is the map. Getting the map right is what keeps proportions, symmetry, and small internal detail intact on a curved, living surface.
The traditional way: tracing by hand on hectograph paper
The low-tech method needs four things: your printed or hand-drawn design, a ballpoint pen, write-on or thermal stencil paper, and transfer gel for the later skin-application step. A typical four-ply thermal sheet has a white master sheet on top, a removable translucent protective tissue, a purple carbon layer, and a yellow backing that holds the stack together. Remove the protective tissue before tracing or loading the paper, and follow the paper and printer manufacturer’s directions because the feed setup can vary (Spirit Tattoo).
The steps:
- Remove the translucent protective tissue, keep the white master sheet against the purple carbon layer, place your design on top of the white master, and trace it with firm, even pressure.
- Separate the white master sheet carrying the purple stencil and cut it out, leaving a small border around the artwork.
- Prep the skin: clean, shave, then wipe with alcohol and let it dry.
- Apply a thin film of skin-safe transfer gel to the prepared skin and wait until it gets tacky (about 30–60 seconds).
- Place the purple stencil side onto the gel once, hold 10–15 seconds without sliding it, then peel slowly from one corner.
The catch is line weight. A hand-traced stencil is only as clean as your hand. Too little pressure leaves broken lines; too much tears the paper or blows out the lines. Experienced artists also warn against resting your hand on the sheet (purple smudges) and against trying to shade with the pen — a stencil is linework only (Eat Healthy 365).
Where an AI stencil generator changes the work
The tedious part of turning reference art into line is the part a generator removes. You upload a drawing or photo, describe the result, and the tool strips fills, color, and texture — keeping only the contour a needle can follow (GenTattoo). For a custom drawing like my moth, that means:
- Background removal — a busy background stops being interpreted as part of the design.
- Line clarity — the tool highlights the significant contour lines and drops noise that would break into fragments at small size.
- Cleaner sizing handoff — export the contour, then set its physical dimensions before printing; some dedicated stencil tools also offer true-size PDF formats such as A4, A5, Letter, and Legal (StenStill).
A generated stencil is a starting draft, not a finished transfer. Line weight still needs the artist’s judgement at the size you will actually tattoo, and the smallest internal detail usually has to be thinned or dropped by hand. Take the draft to the person doing the work.
How the contour and paper-transfer stages combine
AI contour generation, hand tracing, and thermal printing are not three interchangeable transfer methods. The generator prepares the digital linework; one of the paper routes still has to create the purple stencil that touches the skin.
| Complete workflow | Contour stage | Paper-transfer stage | Equipment | Best for |
|---|---|---|---|---|
| Hand-drawn contour + hand transfer | Draw or refine the linework by hand | Trace it onto write-on or compatible transfer paper | Paper and pen | One-offs and artists without a stencil printer |
| AI contour + hand transfer | Generate and review a clean digital contour | Print on plain paper, then trace that copy onto transfer paper | Office printer, transfer paper, and pen | Photos or custom art when no stencil printer is available |
| AI or prepared contour + thermal transfer | Generate or prepare the digital contour and approve its size | Send compatible thermal paper through a stencil printer | Compatible thermal stencil printer and paper | Repeatable shop workflows and multiple sizes |
None of these replaces the artist. They make the two-stage path from source artwork to an approved paper stencil clearer and more repeatable.
Step-by-step: turn your artwork into a printable stencil
- Start with high-contrast line art. Black lines on white, no grey, no color. Full-color images do not transfer well (The Bridge Tattoo).
- Isolate the subject. Remove the background so the stencil does not pick up furniture, gradients, or shadows as “lines.”
- Generate the single-line contour. Let the tool keep only what a needle follows — outlines per edge, hatching only in the deepest shadow.
- Set the print size to the real skin dimensions. A piece for a finger needs fewer lines than one for a thigh; size the export before you fall in love with it on screen.
- Create the paper stencil by the correct route. Trace by hand onto write-on or compatible thermal transfer paper, or run compatible thermal paper through a thermal stencil printer according to its instructions. An ordinary inkjet or laser printer does not create the purple skin-transfer layer by itself.
- Check the transfer orientation. Lettering and directional artwork can appear reversed after the stencil is placed on skin. Follow the paper or printer’s mirror-setting instructions, then inspect the finished purple stencil in the same orientation that will touch the skin. If it would read backward, mirror the source and recreate the stencil.
- Apply gel only when transferring to skin. Put a thin layer of skin-safe transfer gel on prepared skin, press the finished paper stencil into it without sliding, then let the transferred lines set for 10–15 minutes before any tattooing.
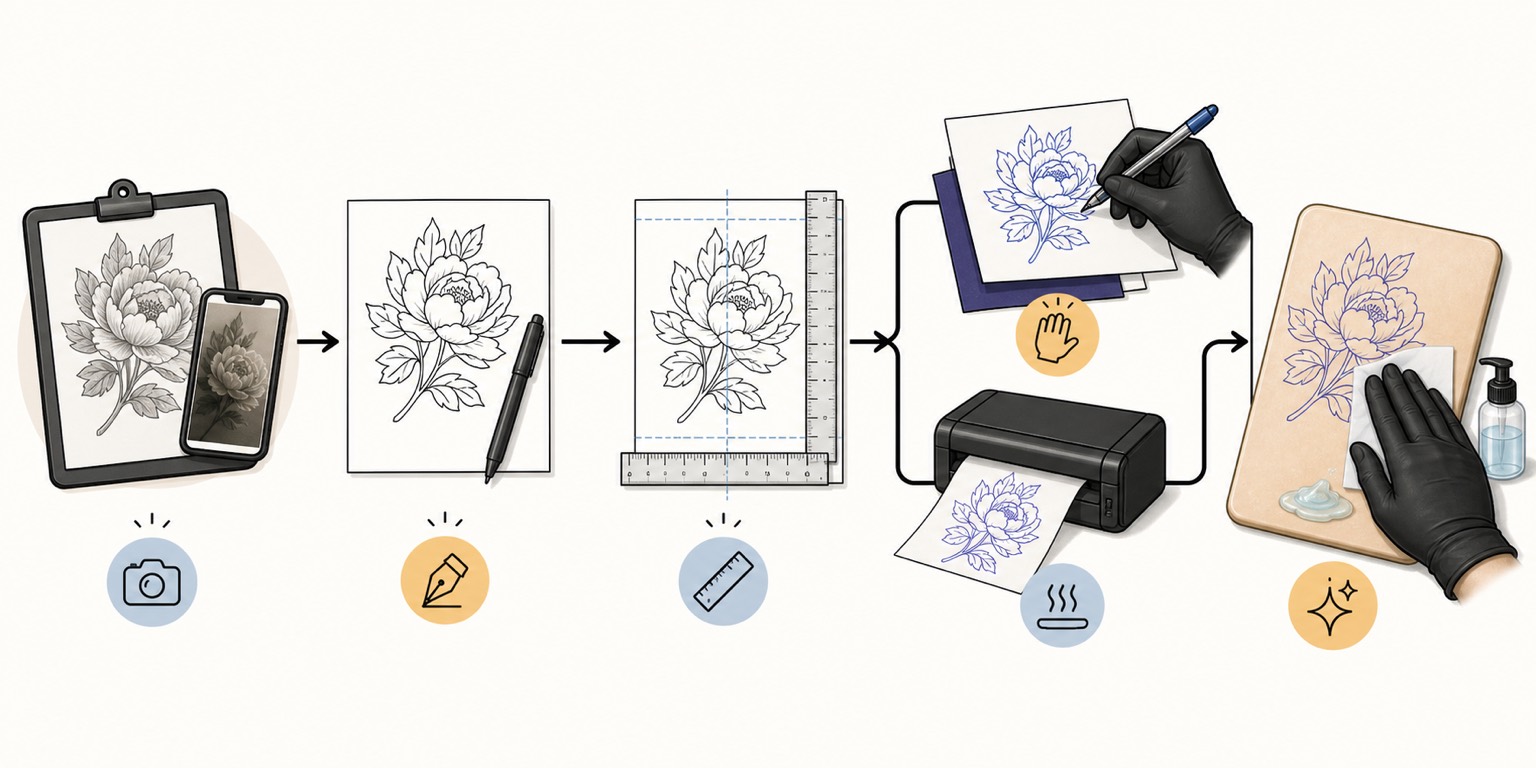
If you want to skip manually extracting the contour from a drawing or photo, the InkBolt stencil generator creates a clean digital draft in seconds. Download the result, size the printout for the intended placement, then trace that printout onto transfer paper or use a compatible thermal stencil printer.
Why print sizing matters more than people expect
The single most common home-stencil mistake is designing at screen scale and discovering on skin that fine internal lines have merged. Print the stencil at the exact dimensions you intend to tattoo and read it on paper first. If a gap closes up as ink spreads, open it out by hand before the transfer goes on. This is the same judgement a shop applies when it scales flash art to a specific body part.
For more on how motif choice affects how a piece holds up over time, see our guide to tattoo motifs that age well and the AI tattoo generator walkthrough.
Safety boundaries you should not skip
A stencil is for transfer only. It is a guide, not a license to tattoo from a screen. Two rules matter:
- Use skin-safe materials. Office carbon paper bleeds and is not skin-safe; use proper thermal or hectograph transfer paper and a designed-for-skin gel (Stencil Stuff, Electrum, and similar). Avoid scented deodorants and perfumes as adhesives (Tommy’s Supplies).
- Hygiene and licensing. Wear gloves, use disposable razors, clean with diluted green soap then 70% isopropyl alcohol, and never double-dip gel. If you intend to tattoo, local health rules may require licensing, sharps disposal, and a controlled environment.
The U.S. FDA notes that no color additives are approved for injection as tattoo ink, and unsterile equipment or contaminated ink can transmit infectious disease such as hepatitis (FDA: Tattoos and Permanent Makeup). A stencil cannot fix an unsafe setup — plan the whole process around clean, regulated practice.
The video above is a useful reminder of why line quality matters: a stencil that is clean at size ages into a tattoo that still reads years later.
FAQ
How do I make a tattoo stencil at home? Start with a high-contrast black-line version of your design. Either trace it by hand onto write-on or compatible transfer paper, or use an AI generator for the contour and then choose one of two paper routes: print it on plain paper and trace that copy by hand, or send it to thermal paper with a compatible stencil printer. Apply only the finished paper stencil to prepared skin with skin-safe transfer gel.
Can I use regular printer paper for a tattoo stencil? You can print on plain paper, but you still have to trace it onto stencil (transfer) paper before it will stick to skin. Office paper alone is not skin-safe and will not transfer. Proper thermal or hectograph paper is the standard (The Bridge Tattoo).
How long does a tattoo stencil last on skin? With a proper transfer gel, a stencil can stay visible for several hours — long enough for a session. Let it set 10–15 minutes before tattooing, and dab (do not wipe) excess ink during the work to keep it from fading (Hand Poke Tattoo).
What is the difference between thermal paper and carbon (hectograph) paper? Carbon paper is traced by hand and needs no machine — good for one-offs. Thermal paper is run through a thermal copier/printer and gives faster, sharper, repeatable lines for complex designs, at a higher equipment cost (Eat Healthy 365).
Can I resize a tattoo stencil? Yes. Adjust the print settings or resize the file before printing so the stencil matches the body area. Always check the resized stencil at actual size on paper, because fine detail that looks clear on screen can merge when printed small.
Turn your sketch into a stencil
Creating the digital contour no longer has to take an evening. Whether you hand-trace the finished contour onto hectograph paper or send it through a compatible thermal stencil printer, the goal is the same: a flat black line map the artist can follow with confidence. Keep the background out, print at true size, and respect the skin-safety rules.
Ready to convert your drawing? Open the InkBolt stencil generator and get a clean stencil draft in seconds — then size the printout and take it to your artist for the final call on line weight and placement.